Updated: I wrote the post first, and then went back and added in the pictures. I wanted to get the post out as soon as possible, but knew the pictures would take a little get to get ready.
What you will need:
- Bare yarn in a skein - I use superwash wool, but you can use any animal based fibre or nylon (the only synthetic that works with this method)
- Artificial colour - I will be using Wilton Color Right food colouring, but you can use any food colour, Kool Aid, or Easter Egg dye tablets.
- Acid - Citric acid is my acid of choice, but vinegar also works. Note: If you are using Kool Aid, there will be citric acid in in the dyestock.
- Something to soak your yarn in
- Plastic wrap
- Containers to mix your dye in
- A microwave
- A large microwaveable plate
- Medicinal syringes - you can use squeeze bottles, but I find the syringes give you more control
- Newspapers/flyers/puppy training pads (last one sounds funny but I know people who swear by them)
- Latex gloves
- Mild dish soap or baby shampoo
- Lots of paper towels
- Towel
- Cooling rack and rimmed baking sheet (optional - I will put steps on how to use this and how to dye without this as well)
Step 1 - Soak your yarn
Make sure that your skein has at least two figure 8 ties on it. You can add more if you are concerned about the yarn getting tangled, but I have found that if you are careful, 2 can be enough. My first yarn was done with a skein I bought from Knit Picks, and it only had the two ties.
In the vessel of choice, add room temperature to slightly warm water. I used to use cold, but my hands got numb while pushing the yarn into the water, so I switched. You just want to be sure you are not using hot water, as that can felt some yarns. I like to use a long Rubbermaid container to soak my yarn, so the yarn does not get too bunched up. This helps avoid tangling. A sink can also work well, or any of a bunch of different types of plastic storage containers.
Add your acid. For citric acid, I use 1 tablespoon of the powered citric acid. For vinegar, I add about half a cup to a cup. Mix well so the acid is dissolved and distributed in the water. If you are using Kool Aid, there will be citric acid in the dyestock and you may not need to do this part. I think the couple of times I used Kool Aid, I still added it to the soaking water.
Add your yarn. There are a few things you can do here. You can just lay your yarn on top of the water and walk away. The yarn will eventually get saturated enough to sink into the water on it's own. If you have lots of time, this is the easiest way to do it. If, however, you are like me and are a tad on the impatient side, you can push the yarn down into the water, gently squeezing the air out to help the yarn stay under the water.
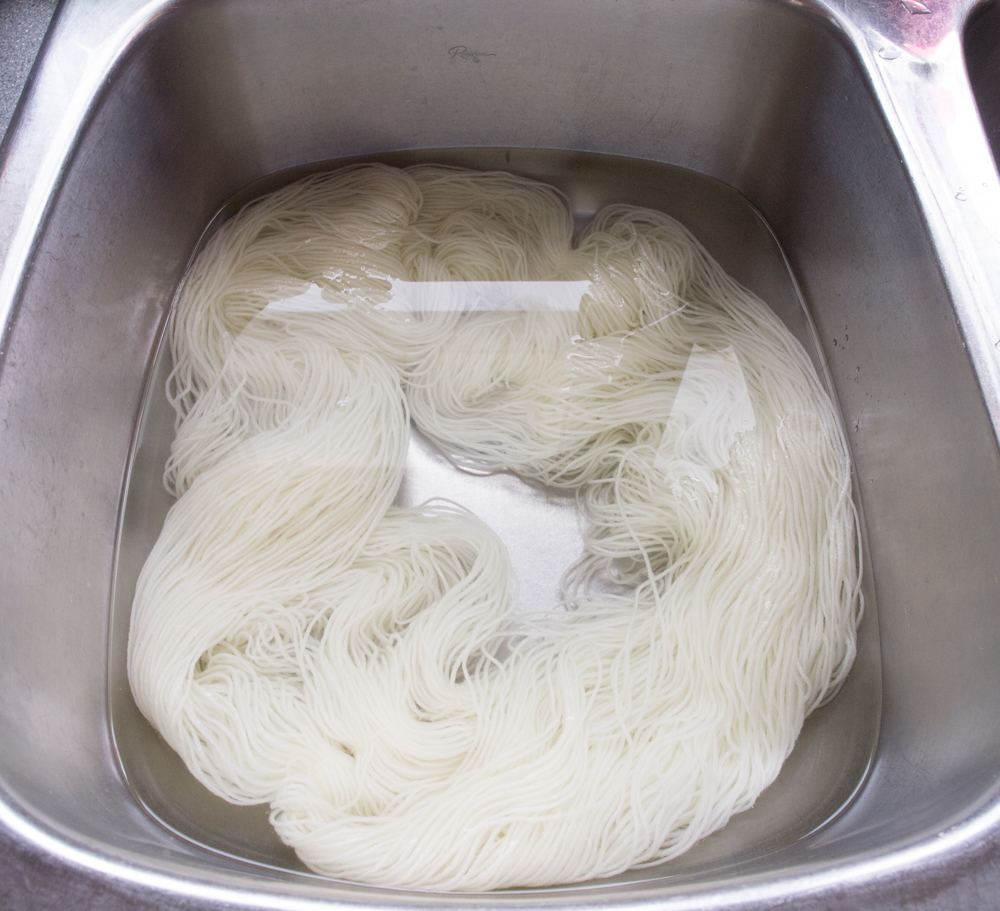 |
| Yarn soaking in the sink |
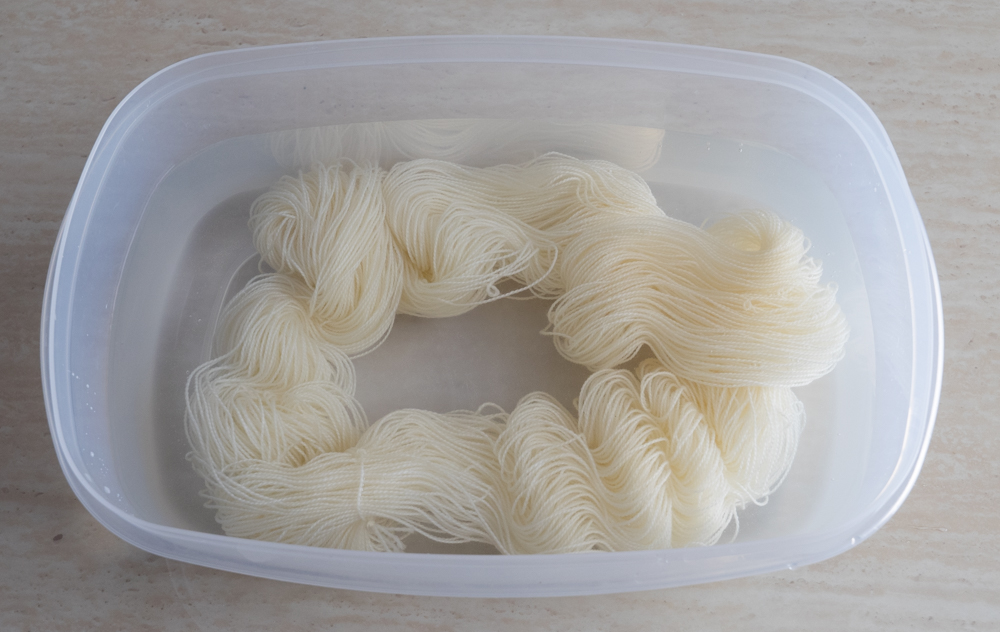 |
| Yarn soaking in my Rubbermaid Container This is one skein of Bare Hawthorn fingering weight yarn |
Leave your yarn soak for at least half an hour after it has completely submerged. If you need to leave it longer, that is fine. I have soaked mine for over 24 hours a couple times because something came up and I could not get back to it. Another reason the Tupperware container comes in handy.
Step 2 - Set up your work area
While your yarn is soaking, or when you are getting ready to start dyeing, set up you work area. You will want to cover the surface with lots of newspaper/flyers/puppy training pads to protect whatever surface you are working on. Some of these colours are a beast to scrub off of a white tile counter.
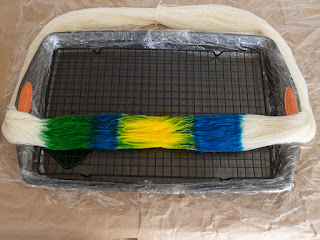
If you are going to use the cooling rack, you will want one that is small enough to fit inside a rimmed baking sheet OR you will need an extra towel to go under it to catch the water. You will be applying the dye on the yarn in sections while it is on the rack, and the baking sheet or towel under it will catch all the excess water/dye. I have found if you wash the towel that day, the colour comes out no problem, but if you are going to use a towel, pick one you don't mind getting colour on.
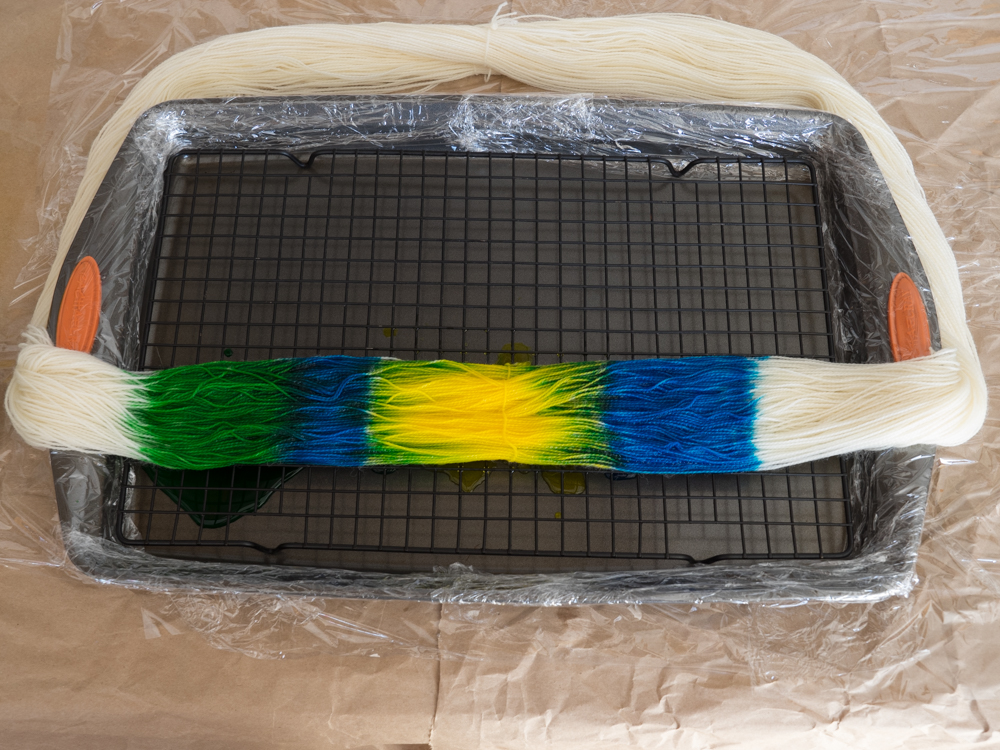
If you are not going to use the cooling rack, lay out some plastic wrap. You are going to be wrapping your whole skein of yarn in plastic wrap, so you want to make sure you lay the plastic wrap out in a way that makes this easy. I basically make a large rectangle with it, that has a hole in the middle. I lay out two long strips of it on the top and bottom of my work area, then lay two smaller strips along either side, leaving the middle open. You will need to know the approximate size of your skein of yarn so you are laying out the right amount of plastic wrap.
 |
| I wrapped the outside edges of the baking sheet in plastic wrap because I use this pan quite often for quite a lot of things, and I didn't want to run the risk of any residual grease getting on the yarn. I wash them well, but you never know. |
 |
| The yarn laid out on the cooling rack, ready to work with. |
If you are not going to use the cooling rack, lay out some plastic wrap. You are going to be wrapping your whole skein of yarn in plastic wrap, so you want to make sure you lay the plastic wrap out in a way that makes this easy. I basically make a large rectangle with it, that has a hole in the middle. I lay out two long strips of it on the top and bottom of my work area, then lay two smaller strips along either side, leaving the middle open. You will need to know the approximate size of your skein of yarn so you are laying out the right amount of plastic wrap.
 |
| This is from a different dyeing session, but it will give you an idea of what it looks like |
Step 3 - Prepare your dye stock
This is a good time to put on your gloves. I don't wear them very often, but when I do, this is when I put them on. Otherwise you could wind up trying to explain why your fingers are dyed such pretty colours....
Depending on how many colours I am using, I will either use the 8oz or 10oz glasses that came in my standard glassware set. If I am doing 5-6 colours, I will use the 8oz. If I am only doing 3-4 colours, I will use the 10 oz, since I will need more of each colour. And I like to use warm water (not hot) to mix my dyes, just to make the mixing easier.
This next step is personal preference, and will probably be a bit of trial an error for you. I recommend you keep track of it, in case you need more dyestock. Add the colouring to the water. When I am using my Wilton Color Right system, I tend to use about 5-6 drops per glass for most colours, although I have used up to 40 drops for a black. If you want to test what the colour looks like, you can use a fork to drop a little bit on a paper towel, although I do find some of the colours break quite quickly on paper towel, and sometimes prefer to just have some pre-soaked scrap yarn available to dip dye as a test.
Once your dye stock is mixed up, make sure you work surface is clean. I have accidentally dyed sections of the of my yarn with spilled dyestock or food colouring that I did not know was there. In fact, I managed to do it with the skein I was using to create the photos for this post
At this time, you also want to get whatever implements you are using to apply your dye. I like medical syringes, as they give me the most control. You should also use this time to determine the order you want to apply the colours. For the purposes of this post, we are not thickening the dye stock. This means, when you put colours next to each other, there will be some bleeding between the colours. Keep that in mind as you decide the placement of the colours, and try to put colours next to each other that blend nicely. Blue next to red, yellow or green, red next to blue or yellow, etc.. Red and green will combine to make a brownish colour, as will most colours that are across from each other on a colour wheel.
 |
| Pink, yellow, purple, blue and green, all made from Wilton Colour Right. Pink, yellow and blue are all 6 drops. Purple is 4 drops pink and 2 drops blue, yellow is 4 drops yellow, 1 drop blue |
 |
| One of the accidentally dyed sections of my yarn. I have yellow drops on another section of it. |
Step 4 - Remove the excess water from your yarn
I lift my yarn out of the water and carefully squeeze out most of the excess water. (This allows me to reuse the soaking water for the next yarn if I am doing more than one in a day. ) You don't want to completely wring out the yarn, but you don't want it dripping wet either. You want the yarn to be damp, so it is easier for the dye to absorb into it, but if there is too much water in it, and you are not using the cooling rack, you can wind up with a mess on the bottom of your yarn when you apply your dye.
Step 5 - Apply the dye
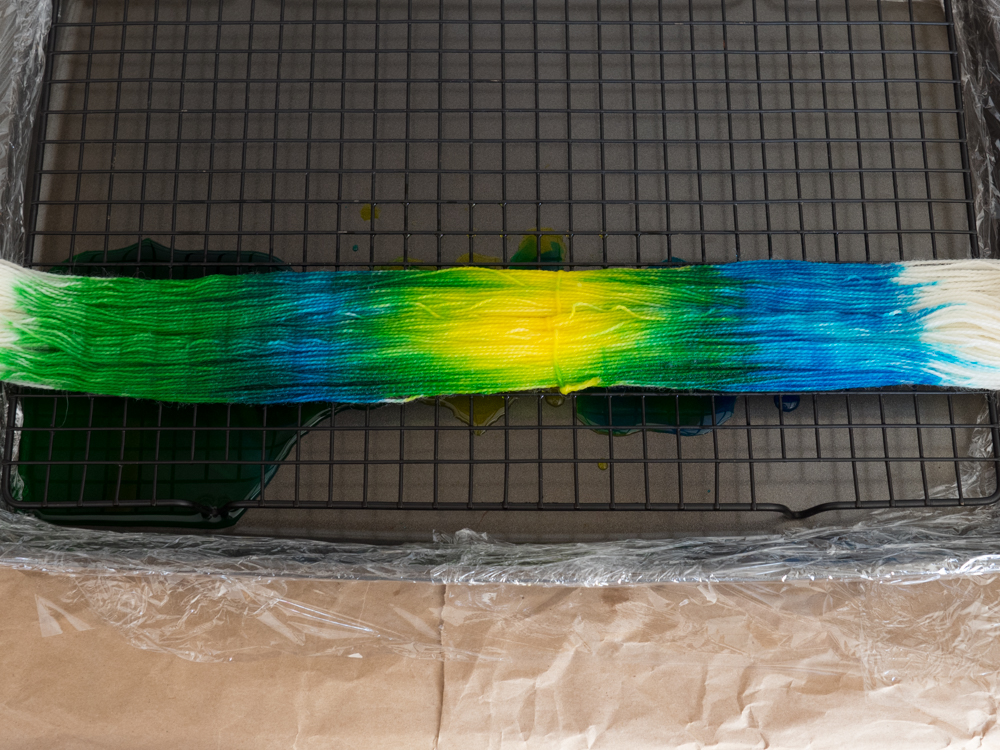
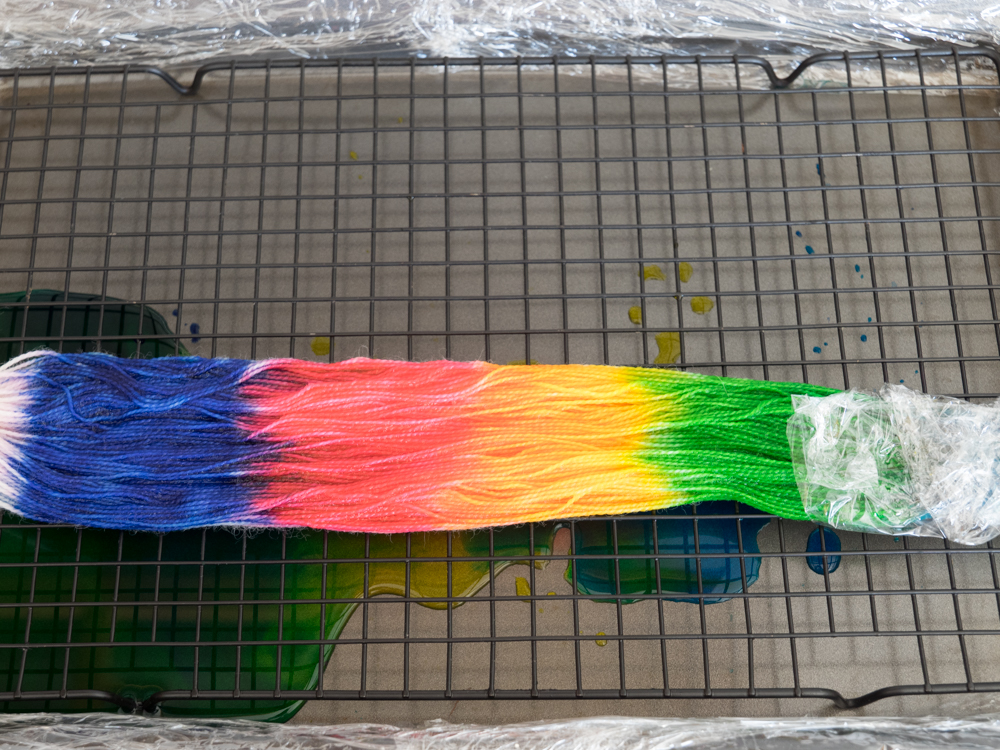
Place your yarn on your plastic wrap or your cooling rack, and apply your dye. Make sure your yarn is nice and loose, not all bunched up. Especially with superwash yarn, since the dye will strike very quickly. You want to spread it out as much as you can to get the best coverage possible.
If you use the cooling rack, the excess water will drip into the tray or onto the towel below it. If you are working right on the plastic wrap, you will have to try to soak up some of that extra water as you go along. You can try putting paper towel under the area you are working on. It will catch some of the dye as well, but will also catch some the excess water. I do find that I go through a LOT of paper towel if I do it this way. But if you don't soak up the excess water, the dye on the underside of the yarn is really going to run together and can make a mess.
I like to use the syringes to draw lines of where I want the dye to go, and then colour in between the lines. I typically work in one section at a time, one colour at a time, but if I have 6 colours and I want there to be 12 sections in total, I may block off the sections before I start filling in between the lines. Just keep in mind that the colours will bleed more into bare yarn than into yarn that has already been dyed.
You will also need to flip the yarn, to make sure that you are getting colour on both sides of it. When you do this may depend on if you are using the cooling rack or not. If you are using it, then once you have dyed the section on the rack, flip that section over, press it down against the cooling rack to squeeze out the excess water, and do the other side.
Once you have a section done, you can wrap it in plastic wrap and move the yarn on the rack to work on the next section. You want to wrap it tight enough so the wrap doesn't fall off, but not too tight. And you will need to leave a little bit of the dyed yarn outside the wrap, because you need to apply the next colour beside it, and you don't want that colour getting caught in the plastic wrap and seeping into the yarn you have already dyed. As you finish this section and are wrapping it, make sure to overlap with the previous section, so you don't have any bare yarn.
 |
| The underside of the yarn. As you can see, there are lighter spots that need to be touched up |
Once you have a section done, you can wrap it in plastic wrap and move the yarn on the rack to work on the next section. You want to wrap it tight enough so the wrap doesn't fall off, but not too tight. And you will need to leave a little bit of the dyed yarn outside the wrap, because you need to apply the next colour beside it, and you don't want that colour getting caught in the plastic wrap and seeping into the yarn you have already dyed. As you finish this section and are wrapping it, make sure to overlap with the previous section, so you don't have any bare yarn.
 |
| Working on the next section, notice that I left a chunk of the green sticking out from the wrap |
 |
| Be careful when flipping your yarn that you keep it in the same spot, or that you move it higher up the rack. I moved this section a bit too far to the left, and managed to get some blue on my pink. |
Dyeing the back of the yarn should take less dye than the front...some of the dye will penetrate through, but especially with superwash, not enough to colour all of it. I find as long as I have about 1/3 of my dyestock left, I don't need to mix up any more. If you find that you are almost out of dyestock, you may want to consider making up another half batch.
You also need to pay close attention to the "ends" of the skeins, particularly if that is where they ties are. The yarn gets bunched up in the areas where the skeins twist on the ends, so make sure to push your syringe around in there and really get the dye worked into it. If you are using yellow or orange, try arranging it so those are the colours that are on the ends. I find it takes less dye stock to achieve those colours, so you will have more off it available to work into those thick areas.
Once all of the dye has been applied, use whatever method you used above to remove some of the excess water (either pressing it against the cooling rack or blotting with/squeezing over paper towel.
Step 6 - Wrap the yarn in plastic wrap
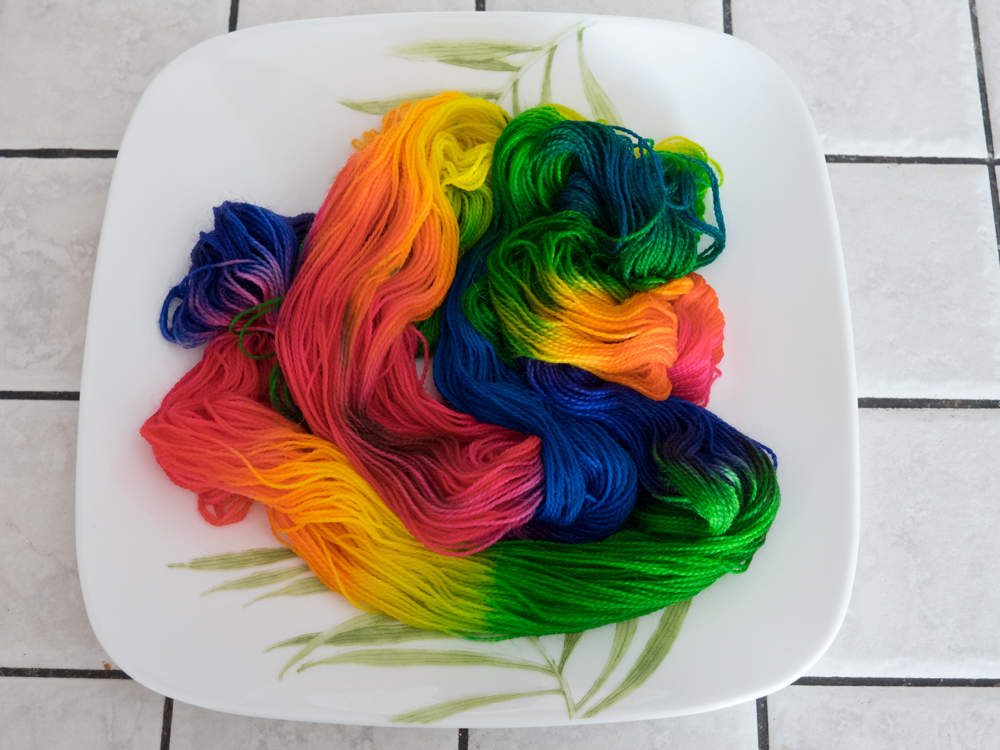
If you have been using the cooling rack, this is probably mostly done for you at this point, as you have been wrapping as you go. Arrange your yarn on a large microwave safe plate/dish, and look for any spots that may be bare. When using the cooling rack method, I tend to put the yarn on the plate and then put wrap over the entire top of the plate, so I know all of my yarn is covered. It does not need to be super tight, but needs to be tight enough not to pop off when it starts to steam up.
 |
| Wrapped as I was dyeing, but there are still some spots that I can tell will be bare once it has been in the microwave, so.... |
 |
| The whole plate gets wrapped in plastic wrap, to avoid any bare spots |
If you are working directly on the plastic wrap, use some paper towel to make sure you mop up any excess dye that may be lingering on the wrap, then roll your yarn in the plastic wrap. You will see that the hole in the middle comes in handy at this point. I usually try to fold the plastic wrap over from the outside and roll the yarn in towards the hole in the centre. Place on your microwave safe plate or dish. Again, look for any bare spots and either wrap them, or cover the entire plate/dish with plastic wrap
Step 7 - Heat set in the microwave
This is why it is important that the yarn be damp and be covered in plastic wrap. The heat in the microwave gets quite high, and your yarn can scorch if it is dry and/or uncovered. As you heat the yarn, steam is going to build up inside the plastic wrap and cause it to puff up. It may even cause it to pop during the heat setting process. This is normal, and has happened to me a few times, which is why I have pauses built into my heat setting process.
 |
| Ready for the heat! |
Microwave on high for two minutes, then open to check to make sure the plastic wrap is still there, and the yarn hasn't gotten free. Repeat this process 4 more times, for a total of 10 minutes. Do not skip the step in between each set of checking the plastic wrap. It only take a few seconds and can save your skein from disaster
Step 8 - Cool your yarn
This is where my impatience kicks in, but try to be less impatient than me. Take your yarn out of the microwave (you may need oven mitts for this, that plate gets hot) and set it on the counter and leave it alone for a while. Clean up you work area, take a walk, watch a tv show, knit something, read a book. I have a real problem with this step. I logically think that if I take the plastic off, the yarn will cool faster, which it will, but remember, you should keep your yarn at temperature for at least 20 minutes, and you have only microwaved it for 10. So even if you are as impatient as I am, leave it alone for at least 10 minutes.
Once the minimum 10 minutes has past, and your yarn has cooled (or your patience has run out), carefully remove the plastic wrap. Avoid the temptation to use scissors to get the plastic wrap off! Trust me on this one... it is not worth the heartache if you cut the yarn by mistake.
If you have removed the plastic wrap before the yarn has completely cooled, give it some time to cool off a bit more. You need to at least be able to handle the yarn, and the cooler it is, the better. I can usually find enough patience for about 10 more minutes. Most of the time I am using that 10 minutes to finish the dishes in my sink so I am ready for the next step.
Step 9 - Gently wash and rinse your yarn
Once your yarn has cooled, run some lukewarm/cool water into the sink and add either a drop or two of a mild dish soap, or some baby shampoo. You can also use wool wash for this, but I tend to keep that for the finished objects. The temperature of the water should be roughly the same temperature as the yarn, as to avoid shocking the yarn and potentially felting it.
I like to keep at least a couple of fingers from one hand wrapped lightly around one of the areas of the yarn the has the ties. This helps avoid tangling while washing and rinsing the yarn. As I wash, I move my hand along the skein, making sure to always keep it separated.
I will mention that in all the times I have use the microwave to heat set my yarn, I have only had colour wash out once, and that was when I really, really, really oversaturated a red and, from what I remember, did not heat set it long enough. For the most part, this step is really just to make sure the yarn is clean, and if you have used vinegar or Kool Aid, to help remove some of the scent from the yarn.
Drain your soapy water and rinse the skein using water of the same temperature. If your yarn/water was warm when you started, slowly cool the water down. Ideally you want your last rinse to be with cool water. It does not have to be cold, but it should be cool. If you are still seeing colour in the rinse, add more soap/shampoo and give it another wash. Rinse and repeat as necessary, making sure to switch up the section of the yarn you are holding as you are washing and rinsing so all yarn gets squeaky clean.
 |
| After washing and rinsing |
Step 10 - Dry your yarn
Once the yarn has been washed and rinsed, squeeze out the excess water. I like to fold my skein over the tap and then twist the two ends of the skein around each other to help squeeze it out. Just don't do it too hard...you don't want to break the tap :)
After you have squeezed out the excess water, place the damp skein on a dry towel, wrap the towel around the yarn and then twist. I have found that I can put one end of the floor and keep twisting the other one to get a super tight twist on it, and it does not damage the yarn I use. You will need to determine the amount of force you want to use.
Now you are ready to dry your yarn. You can hang it to dry over the shower head, drape it over a clothes hanger and put it in your furnace room, hang it on a hook outside that it in the shade, or, if you use superwash yarn and are adventurous/impatient like me, put it on the shoe rack in the dryer.
DO NOT just toss it in the dryer. You will wind up with a huge tangled mess that you will cry over and will have to send it to someone from one of the Ravelry groups that loves the challenge of untangling the seeming impossible tangled mess. I did try once adding about 5 extra figure-8 ties and putting the yarn in one of those delicates bags and throwing it in the dryer, but I would not recommend that either. Remember, I have already made some of these mistake and am trying to save you from the heartache!
 |
| Gotta love superwash yarn and a shoe rack! |
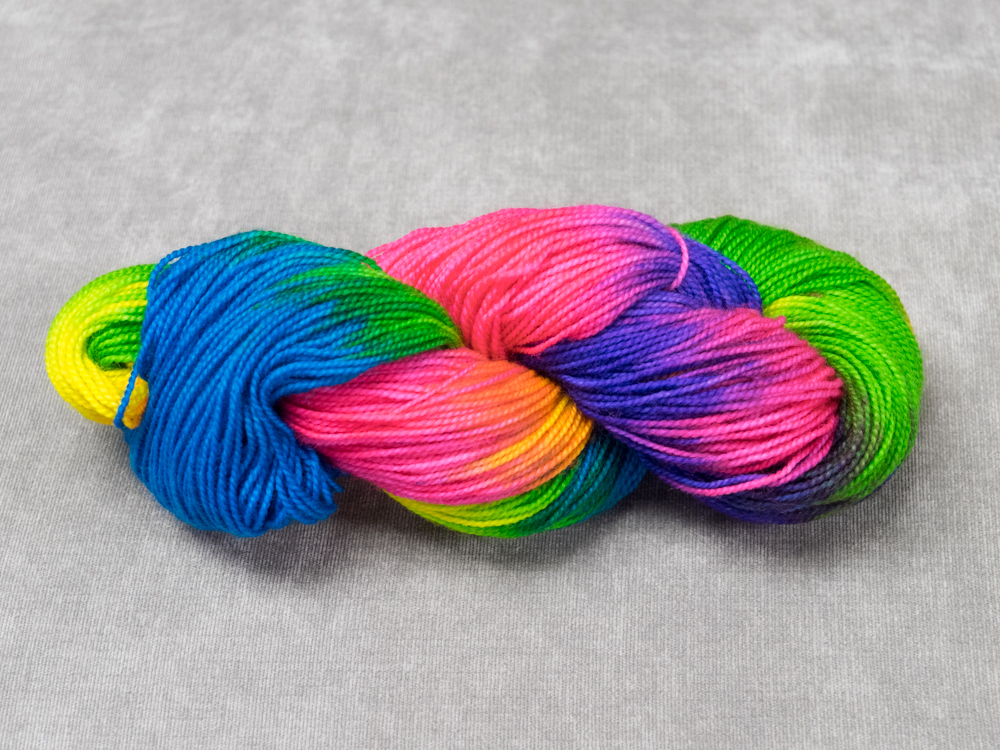
Step 11 - Enjoy your yarn!
Once your yarn is done, you are ready to twist up your skein, reskein it, wrap it in a centre pull cake, wrap it in a ball, or do whatever you like to do with your yarn! Now is the time to take pictures and bask in the glory of the compliments from people wondering how you did that!
 |
| Directly out of the dryer, as dyed |
 |
| The other side of the skein, directly out of the dryer, as dyed |
 |
| Reskeined - I don't normally do this, but I really wanted to see how this turned out. Reskeined like this, you can't find the sections that were accidentally dyed with the wrong colours |
When you say you use citric acid, are you using the kind you'd use when canning fruit, such as the Ball brand, that has other ingredients in it as well as the citric acid? Thanks!
ReplyDeleteHi Miss Tori
DeleteI buy mine from a local wine making shop. It is MUCH cheaper than the stuff you use for canning. I think I paid $8 for a 1kg bag of it. I just store the powder in an airtight container, and mix up the liqud as I need it. I tend to dye in spurts, so if I mix up one cup, I will use if over the course of a couple of days, so I just keep it in a mason jar. You CAN leave it too long, which will cause it to develops little globs in it. If you see those, dump it out and mix more :)
I have heard you can also buy it on Amazon, but I like the instant gratification of picking it up at the store
WOW!!! So the plastic doesn't melt? Cool! I have to try this one day. Thank you!
ReplyDelete